The following is a description of the main systems for controlling the program and piloting the plane. It is assumed that the reader is already familiar with flying, possibly from experience on other simulators. If you are completely new to flying, the tutorials in section 7, Tutorials are a better resource for learning to fly using FlightGear.
A short leaflet showing the standard keys and designed to be printed can be found under the installation directory:
FlightGear/Docs/FGShortRef.pdf
A reference to most of the keyboard controls can be found under the Help menu in the simulator.
Depending on the type of aircraft, you may have to start the engine(s) before you can go flying. The instructions below are generic. Check the aircraft help or aircraft tutorials for more specific instructions.
Once you’ve started the engine, you should check whether the parking brakes are engaged. If so, press the B key to release them.
For piston-engined aircraft, the magnetos are controlled by the { and } keys. On most aircraft, the starter is engaged using the s key. On multi-engined aircraft you can select which engines to control. Use ~ to select all the engines at once. Most magnetos have 4 positions – OFF, LEFT, RIGHT and BOTH. So, to start the selected engine, press the } key three times, then hold down s.
Note that the starting procedure for powerful WWII-era fighter aircraft is often more complex. See the aircraft help for details.
Starting a turboprop engine generally requires simply moving the condition lever from Off to Idle, using the m key.
Starting a jet aircraft is significantly more complex, and the controls vary between different aircraft.
While joysticks, yokes and rudder pedals are supported, you can fly FlightGear using the keyboard alone or in conjunction with a mouse, described below. However you choose to control the aircraft, you will need to use the keyboard for at least some control actions.
These key bindings are not hard-coded, but user-adjustable. You can check these setting
via the file keyboard.xml which can be found in the main FlightGear directory. This
is a human-readable plain text file. We do not recommend modifying the files in
the installation directory, but based on this file, you can create your own, in any
location, and include it using a --config=path/to/your-keyboard.xml command line
option. Although it is perhaps not the best idea for beginners to modify this file,
more advanced users will find it useful to change key bindings according to their
wishes, e.g. to match other simulators. Also remember that each aircraft can also
have its own key bindings, which you should look for in the catalog of a particular
aircraft.
In order to have full control of the plane via the keyboard you should ensure that NumLock is on, and the FlightGear window must be active (i.e. have focus.)
The keys shown in table 5.1 cause a deflection of the aircraft control surfaces or its throttle position.
Additionally, table 5.2 shows the keys that control the engines.
| Key | Action |
| ! | Select 1st engine |
| @ | Select 2nd engine |
| # | Select 3rd engine |
| $ | Select 4th engine |
| ∼ | Select all engines |
| { | Decrease magneto on selected engine |
| } | Increase magneto on selected engine |
| s (hold) | Fire starter on selected engine(s) |
| M / m | Lean/Enrich selected engine mixture |
| N / n | Decrease/Increase selected propeller RPM |
And the keys for the control of secondary aircraft systems are included in table 5.3.
To change the view direction, you must de-activate NumLock. The available controls are listed in table 5.4.
Additionally, table 5.5 includes the keys that allow you to control the display.
| Key | Action |
| P | Toggle instrument panel on/off |
| c | Toggle 3D/2D cockpit (if both are available) |
| S | Cycle panel style full/mini |
| Ctrl-c | Toggle panel/cockpit hotspot visibility |
| h | Toggle HUD |
| H | Change HUD brightness |
| i / I | Minimize/maximize HUD |
| x / X | Zoom in/out |
| Ctrl-x | Reset zoom to default value |
| v / V | Cycle view modes forth and back |
| Ctrl-v | Reset view modes to pilot view |
| z / Z | Increase/Decrease visibility (fog) |
| Ctrl-z | Reset visibility to default value |
| F10 | Toggle menu on/off |
| Shift-F10 | Toggle fullscreen mode on/off |
Finally, the general simulator controls are included in table 5.6.
FlightGear supports two types of autopilot – a generic autopilot that works with all aircraft (even those that would not normally have an autopilot), and aircraft-specific autopilots that are controlled from within the cockpit.
The generic autopilot is controlled via the keys shown in table 5.7.
| Key | Action |
| Backspace | Toggle autopilot |
| Ctrl-a | Toggle altitude lock |
| Ctrl-g | Toggle glide slope lock (NAV 1) |
| Ctrl-h | Toggle heading hold |
| Ctrl-n | Toggle NAV 1 lock |
| Ctrl-s | Toggle autothrottle |
| Ctrl-t | Toggle terrain follow (AGL) lock |
| Ctrl-u | Add 1000 ft to your altitude (emergency) |
| F6 | Toggle autopilot heading mode |
| F11 | Autopilot altitude dialog |
| 8 / 2 | Altitude adjust |
| 4 / 6 | Heading adjust |
| 9 / 3 | Autothrottle adjust |
Ctrl-t is especially interesting as it makes your aircraft behave like a cruise missile, and follow the terrain. Ctrl-u might be handy in case you feel you’re just about to crash.
As well as selecting menu items and clicking on controls in the cockpit, your mouse can be used for a variety of other valuable functions in FlightGear.
There are three mouse modes: Normal, Flight Control, and View Direction. These modes enable you to Interact (e.g. click things), fly the aircraft, and look around, respectively. You can change between modes by using the Tab key.
In normal mode, you can control the menus and the panel controls. This mode is indicated by a normal arrow cursor.
To change a switch or toggle, simply click on it with the left or middle mouse button.
To change a knob on a radio or linear control such as the throttle, click on the left-hand side to decrease the value, and the right-hand side to increase the value. Click with the left mouse button to make a small adjustment, or the middle button to make a large one. Some controls, such as radios, also support using the mouse wheel, while others, such as throttles, support dragging the mouse with the left button pressed.
Pressing Ctrl-c highlights the clickable hotspots of objects that may be acted upon.
In control mode you can control the aircraft flight controls by moving the mouse. This mode is indicated by a cross-hair mouse cursor.
In this mode, moving the mouse left or right controls the ailerons, which will roll the aircraft. Moving the mouse forwards and or backwards controls the elevator and changes the pitch of the aircraft.
Holding the left mouse button down changes the behaviour so that moving the mouse left/right controls the rudder. Holding the middle mouse button down and moving the mouse forwards/backwards controls the throttle.
Finally, the scroll-wheel may be used to set the elevator trim.
This mode is particularly useful if you do not have a joystick, as it provides for much
finer control of the aircraft than using the keyboard alone. If you intend to use
the mouse to control the aircraft regularly, it is recommended that you enabled
auto-coordination, so that the ailerons are linked to the rudder. This can be done using
--enable-auto-coordination when launching the simulator, or selecting auto-coordination from
the launcher.
In view mode you can look around using the mouse. This mode is indicated by a double-headed arrow cursor.
Simply moving the mouse pans and tilts your view in the current position. This is particularly useful for looking around the cockpit, or out a side window. The scroll-wheel can be used to zoom in or out. Clicking the left mouse button resets the view back to its initial position, usually straight ahead.
Holding down the middle mouse button and moving the mouse allows you to move the viewpoint itself left/right and up/down. Moving the mouse while both the middle button and Ctrl are held down allows you to move the viewpoint forwards and backwards.
The menu bar provides access to a variety of options for the simulator and the aircraft. Many aircraft have their own menu items, for changing their registration to automatically starting their engines. These can be found at the end of the menu bar.
To display or hide the menu bar, press F10. You can also display the menu automatically by moving your mouse to the top of the screen.
The menu bar provides the following menus and options.
File
Autopilot This menu is only available for aircraft that have the default autopilot configured. Some aircraft may have their own autopilot which is configured through the panel, in which case this menu is disabled.
--httpd=8080 command line option.)

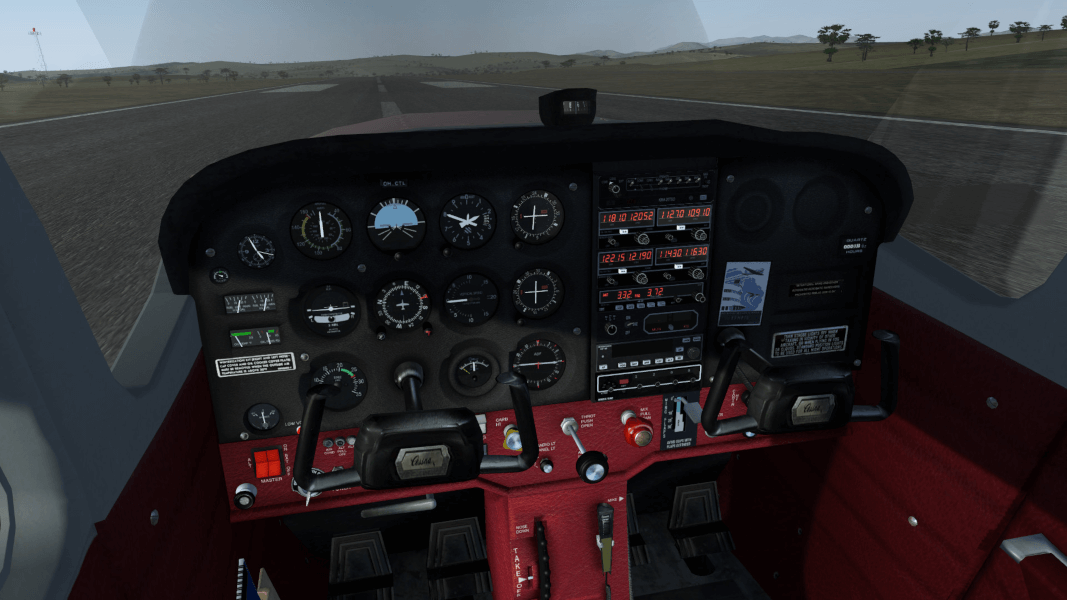
Aircraft within FlightGear can have both a 2-dimensional and a 3-dimensional instrument panel within the cockpit. The 3-dimensional cockpit provides a much more realistic pilot-eye view, but can be difficult to read with small monitors.
The default Cessna 172P (c172p) has both a 3-dimensional and 2-dimensional cockpit. The 3D cockpit is activated by default when you start FlightGear, but you can overlay the 2D instrument panel by selecting: View → Display Options → Show 2D Panel from the menu, or by pressing P.
All panel levers and knobs can be operated with the mouse. To change a control, just click with the left/middle mouse button on the corresponding knob or lever. For controls that have a range of positions, use the middle mouse button for larger adjustments. In general, clicking on the right side of a control will increase the value, while clicking the left side of the control will decrease the value.
Some instruments (particularly radios) also support use of a mouse scroll-wheel to change values. Other controls (such as throttle) can also be dragged using the left mouse button.
FlightGear also provides a HUD (Head-Up Display). HUDs are generally found in military aircraft and some very advanced jets. However, FlightGear also allows you to use a HUD on many GA aircraft. To activate the HUD, press h key.

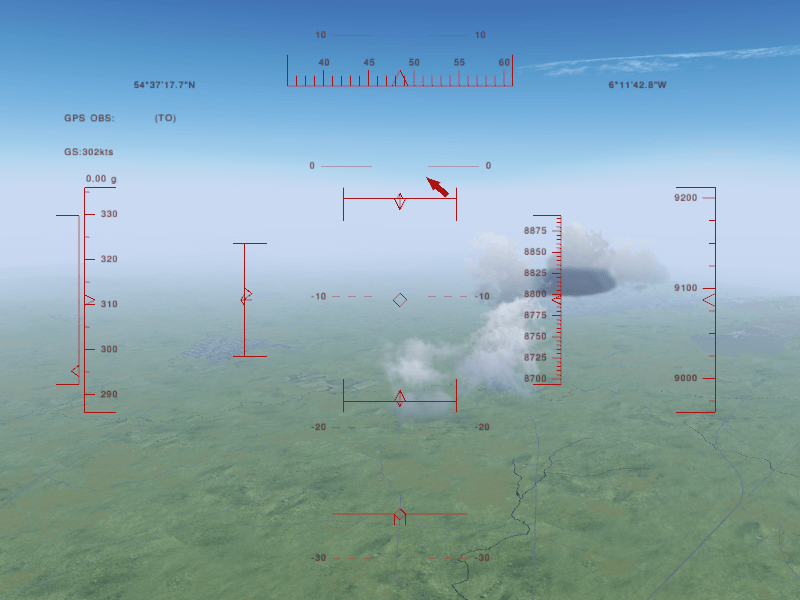
The HUD shown in Fig. 5.2 displays all main flight parameters of the plane. In the center you find the pitch indicator (in degrees) with the aileron indicator above and the rudder indicator below. A corresponding scale for the elevator can be found to the left of the pitch scale along with a pitch trim indicator. On the bottom there is a simple turn indicator.
There are two scales at the extreme left: The inner one displays the speed (in kts) while the outer one indicates position of the throttle. The two scales on the extreme right display your height – the left one shows the height above ground while the right of it displays height above sea-level, both being displayed in feet.
Besides this, the HUD delivers some additions information in the upper area. On the left you will find GPS, Ground Speed, and G-Force. The top also displays your current position, in latitude and longitude.
The large arrow points to the active control tower.
You can change color of the HUD using the H or h key. Pressing the toggle i/I minimizes and maximizes the HUD.